Using Swagger in ASP.NET Core Projects
Hi everyone, in this article, I will talk about installing and using Swagger on your ASP.NET Core project.

First of all, Swagger is a documentation tool for the api you code. It is not just documentation, it also allows you to easily try and see the result. In this way, you can easily debug andresolve errors.
Now let’s talk step by step to the ASP.NET Core Web Api project.
First, we need to install the Swashbuckle.AspNetCore package on your ASP.NET Core Api project via the Nuget package manager.

As a second step, we add the following block of code into the ConfigureServices method in the Startup.cs file of our project.

With this code blog, we actually define Swagger to the project and set the title and version information of the Swagger documentation.
We can also set the information in the photo below at this stage.

When we come to the third step, we add the following code block in the Configure method in the Startup.cs file and specify the JSON file where the Swagger settings will be read.

Thus, I ensure that the configuration file is read. At the same time, with the UseSwagger, we make Swagger working like other settings you actually see in the Configure method.
After these settings, when we run the project and enter “localhost / swagger” address, the page of Swagger will open.
As a final setting, we define the “localhost / swagger” address as the landing page of the project. Thus, we ensured that the project was directed to the swagger address when it was opened.
First of all, we open the settings page by right-clicking on the solution of the project and saying properties. Then, in the window that opens, we define it by typing “swagger” in the Launch Browser section.

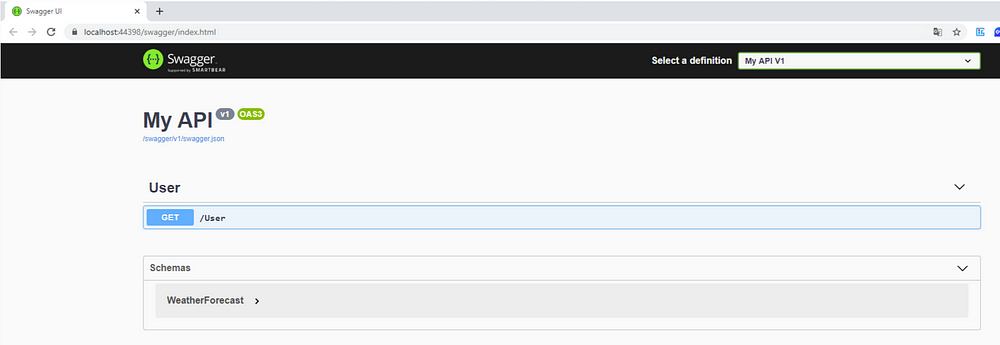
Now when we run the project, we will see the swagger page.

My Api and version section on this page is the information we define on Startup. User, which is located in the lower section as the title, indicates the controller, namely api definitions and the file we code.
The “[GET] / User” section shows the User method, which is the Get method as the HTTP method we defined in the UserController.
Clicking on this method, a screen will appear as below.

In this section, you can see both the request and response information of the method, and you can also try with the Try it out button in the upper right.

As you can see, we clicked the Try it out option and then executed the test of the method we coded by saying Execute. We can easily check the request and response information of the call I have made here.
You can also debug easily by putting a breakpoint for the method you tried in the project code.
As a result, Swagger allows you to quickly test api methods you have written and solve problems, as well as providing a documentation. Using swagger will be very useful for both newcomers and testers.
Thank you for reading, sharing and applause will increase motivation :)